Implementing AWS Auto Scaling Using EC2, ALB & Target Tracking
- Siddhesh Kadam

- Jan 25
- 3 min read

Introduction
In modern cloud environments, auto scaling is critical for high availability, performance, and cost optimization. Instead of running multiple servers all the time, AWS allows you to automatically scale EC2 instances based on load.
In this blog, we will configure:
Apache Web Server on EC2
Auto Scaling Group (ASG)
Launch Template
Target Tracking Policy
Scale out when CPU > 5%
Automatically launch a second Apache instance
This setup is ideal for:
Web applications
Traffic-based scaling
Cost optimisation
High availability
Architecture Overview

Prerequisites
Before starting, ensure:
AWS Account
IAM user with EC2, Auto Scaling, ELB access
Key Pair created
Basic knowledge of Linux & SSH
STEP 1: Launch First EC2 Instance (Apache Setup)
Go to EC2 Dashboard → Launch Instance

Setting | Value |
Name | apache-asg-base |
AMI | Rocky 9 |
Instance Type | t3.small |
Key Pair | Select existing |
Security Group | Allow HTTP (80) & SSH (22) |
Auto-assign Public IP | Enabled |


Add User Data (Auto Install Apache)
Paste this in User Data:
#!/bin/bash
dnf update -y
dnf install httpd -y
systemctl start httpd
systemctl enable httpd

echo "<h1>Builddevops Apache Server - $(hostname)</h1>" > /var/www/html/index.html
This ensures Apache installs automatically whenever a new instance is launched.
Launch the Instance
Wait until:
Instance is running
Status checks are passed


Browser test:
http://<PUBLIC-IP>You should see:

STEP 2: Create an AMI from This Instance
We’ll use this AMI for auto scaling.
Steps:
EC2 → Instances
Select your instance
Actions → Image and templates → Create Image

Name: apache-asg-ami
Click Create Image

⏳ Wait until AMI status becomes Available
STEP 3: Create Launch Template
Why Launch Template?
Auto Scaling uses it to create new EC2 instances.
Steps:
EC2 → Launch Templates
Click Create Launch Template

Configuration:
Setting | Value |
Name | apache-launch-template |
AMI | Select your custom AMI |
Instance Type | t3.micro |
Key Pair | Same as earlier |
Security Group | Allow HTTP & SSH |


Click Create Launch Template
STEP 4: Create Target Group
EC2 → Target Groups
Click Create target group

Choose:
Type: Instance
Protocol: HTTP
Port: 80

Health check path: /

Create Target Group
STEP 5: Create Application Load Balancer (ALB)
Steps:
EC2 → Load Balancers → Create

Select Application Load Balancer
Settings:
Name: apache-alb
Scheme: Internet-facing
Listener: HTTP 80

Select:
VPC
At least 2 subnets
Attach Target Group

Create Load Balancer

STEP 6: Create Auto Scaling Group
Go to Auto Scaling → Create ASG

Step 1: Launch Template
Select apache-launch-template

Step 2: Network
Select VPC
Choose minimum 2 subnets

Step 3: Attach Load Balancer
Select existing ALB
Choose Target Group

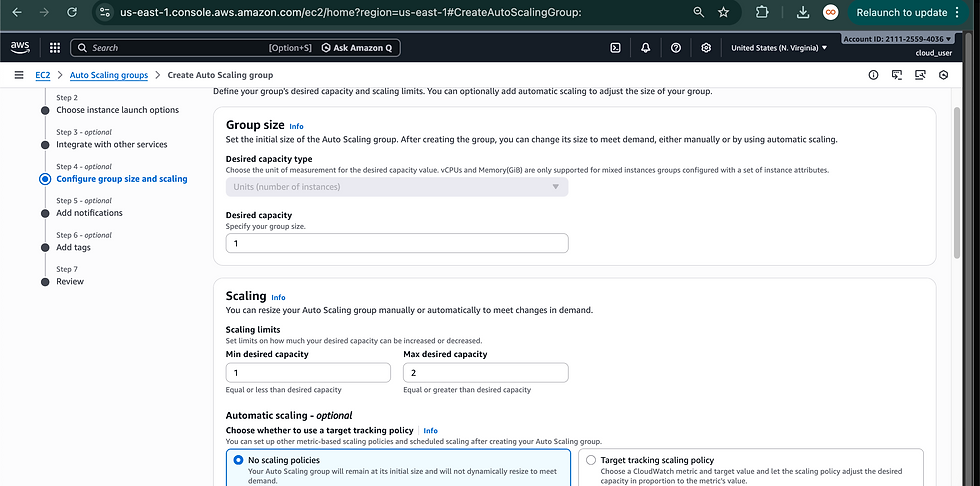
Step 4: Configure Group Size
Setting | Value |
Desired | 1 |
Minimum | 1 |
Maximum | 2 |

STEP 7: Configure Scaling Policy (CPU > 5%)
Choose:
✔ Target Tracking Scaling Policy
Configure:
Setting | Value |
Metric | Average CPU Utilization |
Target Value | 5% |
Instance Warm-up | 60 seconds |


👉 This means:
If CPU > 5% → new instance launches
If CPU < 5% → instance terminates automatically
STEP 8: Test Auto Scaling
Generate Load
SSH into the instance:
[root@siddhesh ~]# dnf install epel-release -y
[root@siddhesh ~]# dnf install stress-ng -y
[root@siddhesh ~]# stress-ng --cpu 2 --timeout 300
What Happens?
CPU crosses 5%
Auto Scaling triggers
New EC2 instance is created
Added to Load Balancer automatically
Check:
EC2 → Auto Scaling Groups → Activity History
As shown above, a new instance was automatically launched when the instance load exceeded 5%.

After the load dropped below 5%, the newly created instance was automatically terminated by the Auto Scaling group, as shown in the screenshot above.
This confirms that the scale-in policy is working correctly and that AWS Auto Scaling is dynamically adjusting the number of running instances based on real-time CPU utilization, ensuring optimal resource usage and cost efficiency.
Best Practices
Use ALB instead of direct EC2 access
Enable CloudWatch alarms
Use Auto Healing
Use HTTPS (ACM SSL)
Use Launch Templates (not Launch Configurations)
Use IAM Role instead of access keys
Conclusion
With this setup, you have successfully:
Created an Apache Auto Scaling environment
Configured CPU-based scaling
Automated infrastructure growth
Improved availability and performance
This architecture is production-ready and scalable.


Comments